How to Build a Custom Sprite Sheet from Individual PNG Frames
When you draw animation frames in programs like Aseprite, Photoshop, Blender, or Procreate, you often end up with a folder full of separate image files: walk_01.png, walk_02.png, walk_03.png, and so on.
While saving individual frames makes drawing easy, loading dozens of loose files into a game engine is bad for performance. Every individual file triggers a separate draw call and filesystem request, which can quickly bog down frame rates on mobile devices and web browsers.
The solution is packing all your loose frames into a single, cohesive sprite sheet texture atlas. In this guide, we will walk through the process of merging multiple image files into an organized grid, configuring padding to avoid graphical glitches, and preparing your assets for any 2D game engine.
Why Pack Loose Frames into a Sprite Sheet?
Packing loose frames into a single sheet gives your game several immediate advantages:
- Reduced draw calls: Game engines can render multiple characters and particles using a single texture bind instead of swapping textures in memory for every frame.
- Lower memory overhead: Packing graphics tightly into power-of-two texture dimensions (like 512x512 or 1024x1024) helps GPUs compress and allocate texture memory efficiently.
- Simplified asset management: Instead of tracking 200 loose PNG files across multiple directories, you manage one master texture file and its corresponding frame coordinates.
Key Considerations Before Packing
Before merging your images, keeping a few best practices in mind will save you time and debugging headaches later.
1. Consistent Canvas Dimensions
Make sure every incoming frame shares the exact same width and height. If frame 1 is 64x64 pixels but frame 3 is 62x65 pixels because of tight cropping, your grid will misalign, causing the character to shake or jitter during playback.
If your frames have varying dimensions, use a centering canvas baseline so every frame shares uniform outer bounds.
2. Grid Ordering and Layout
Decide how you want your animations organized inside the sheet:
- Horizontal strip: All frames placed side-by-side in 1 row. Great for short particle effects or simple 4-frame walks.
- Uniform matrix grid: An $N \times M$ grid (for example, 4 columns by 4 rows). Ideal for multi-directional animations (Down, Left, Right, Up).
- Packed texture atlas: Tightly packed rectangles with JSON metadata defining exact X/Y coordinates.
3. Spacing and Bleed Margins
When a game engine renders a scaled sprite or applies camera smoothing, pixels from adjacent frames can occasionally bleed into view. Adding a 1-pixel or 2-pixel transparent gutter (padding) between frames prevents edge artifacting.
Step-by-Step: Merging PNG Frames into a Sprite Sheet
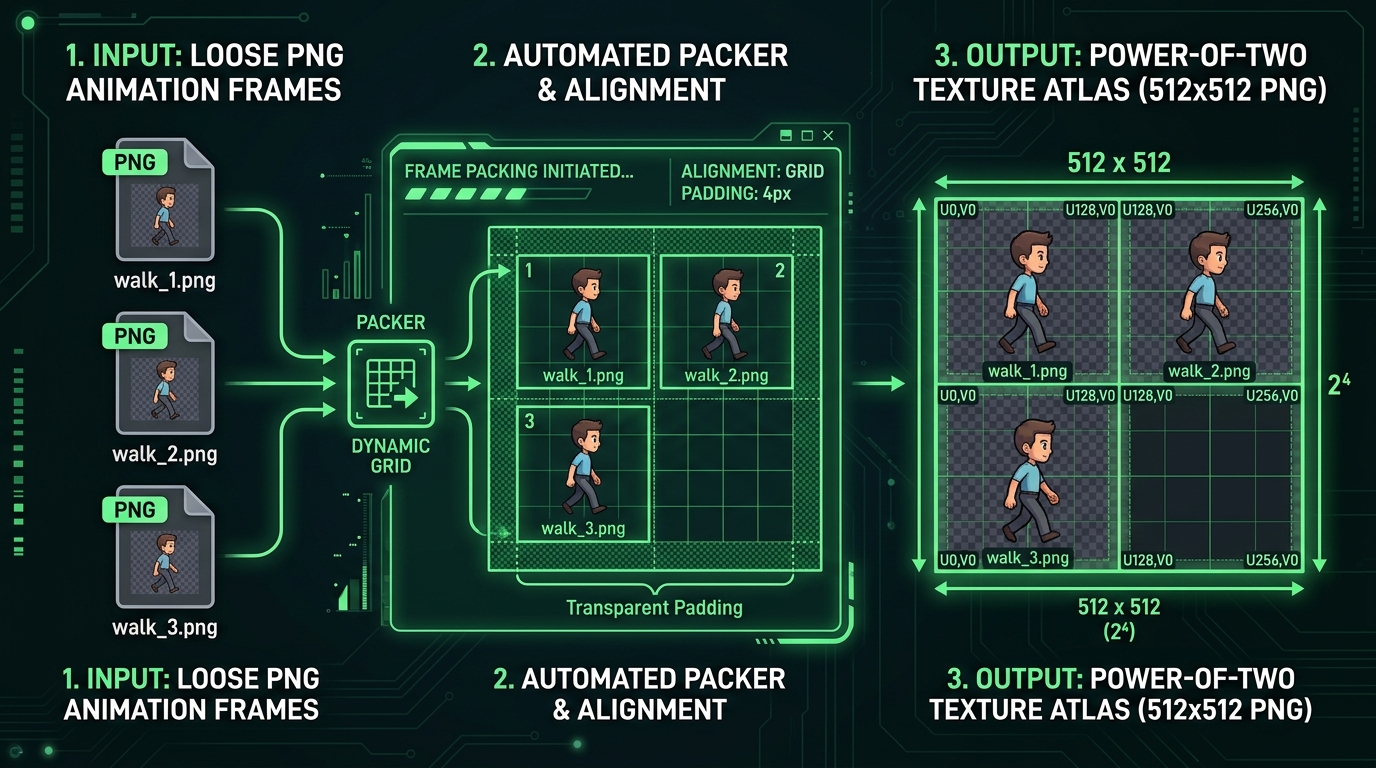
Let’s assemble a sprite sheet using our free browser-based png to spritesheet generator.
Step 1: Select and Upload Your Image Sequence
Drag and drop your sequence of PNG or WebP files into the uploader. Ensure your filenames are sequentially numbered (such as idle_001.png, idle_002.png) so the packer automatically detects the correct animation order.
Step 2: Configure Grid Columns and Alignment
Choose how many columns you want per row. For example, if you upload an 8-frame walk cycle, setting 4 columns will produce a balanced 4x2 grid. If you want a continuous horizontal strip, set the column count to 8.
Step 3: Add Padding and Gutters
If you plan to use this sprite sheet in Unity, Godot, or Unreal Engine, add a 1px transparent border around each cell. This safeguards against texture bleeding during sub-pixel camera movement.
Step 4: Preview and Inspect Bounds
Review the generated texture canvas in the live preview. Verify that:
- Frame numbers appear in the correct sequential order.
- Character limbs do not cross grid partition lines.
- The transparent background is cleanly preserved.
Step 5: Export Your Finished Sprite Sheet
Download the generated high-resolution PNG file. You can also export the animation directly as an animated GIF using our spritesheet to gif converter to preview the motion outside your game engine.
Integrating Your Sprite Sheet into Your Workflow
Once your sprite sheet is exported, you can drop it directly into your engine of choice:
- Web & CSS: Use CSS
steps()animations to cycle through background positions effortlessly. - Godot 4: Create an
AnimatedSprite2Dnode, create a newSpriteFramesresource, and use the grid cutter to import your frames in two clicks. - Unity 2D: Set Texture Type to Sprite (2D and UI), set Sprite Mode to Multiple, and use the Sprite Editor’s Grid Slice tool.
Taking the time to pack and align your loose animation frames properly pays off in faster game performance and a clean, organized asset pipeline.