Importing and Animating Sprite Sheets in Godot 4 (AnimatedSprite2D)
Godot 4 has become a powerhouse for 2D game development thanks to its lightweight footprint, node-based architecture, and developer-friendly workflows.
When it comes to rendering 2D character animations in Godot, the AnimatedSprite2D node paired with SpriteFrames resources makes slicing sprite sheets intuitive and lightning-fast.
In this tutorial, we will walk you through the entire process of importing a multi-frame sprite sheet into Godot 4, slicing it into animation states (such as Idle, Walk, and Attack), setting playback speeds, and controlling animations dynamically using GDScript.
Godot 2D Animation: Two Approaches
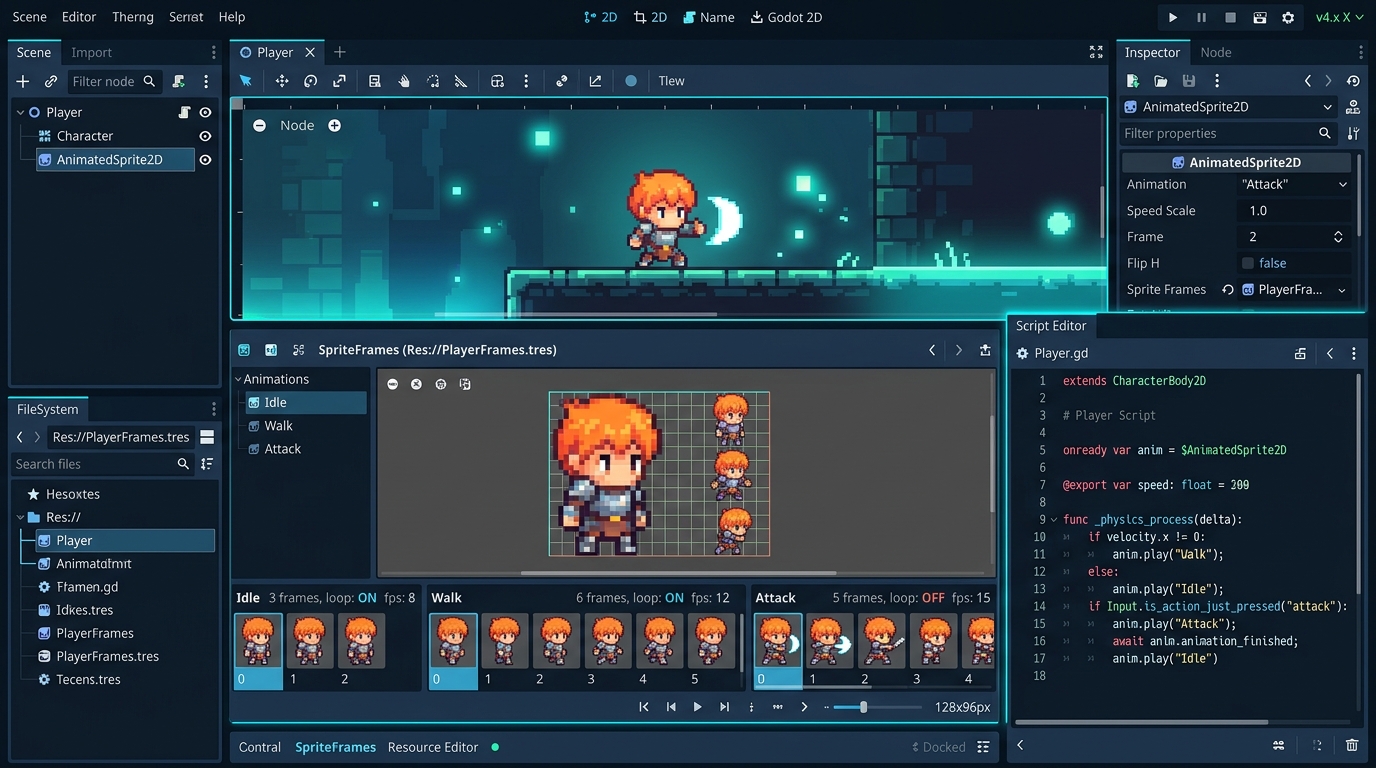
In Godot, there are two primary ways to handle 2D sprite animations:
AnimatedSprite2D(Recommended for frame-by-frame sprites): Uses a dedicatedSpriteFramesasset to store lists of sliced texture frames. It is simple, fast, and purpose-built for classic sprite sheets.Sprite2D+AnimationPlayer(Best for complex bone/rig systems): Manages a single texture and animates properties (like frame index, position, and rotation) along a timeline.
For traditional frame-by-frame 2D pixel art and character walk cycles, AnimatedSprite2D is the cleanest and most efficient choice.
Step 1: Import Your Texture and Set Pixel Art Texture Defaults
- Drag your sprite sheet PNG file into your Godot FileSystem dock (e.g., inside
res://assets/sprites/). - If you are building a pixel art game, you will want to make sure your textures do not appear blurry:
- Go to Project > Project Settings > Rendering > Textures.
- Set Default Texture Filter to
Nearest. - This ensures all imported 2D textures render with razor-sharp pixel edges automatically across your entire project.
Step 2: Add an AnimatedSprite2D Node
- In your 2D Scene dock, add a new child node: select AnimatedSprite2D.
- With the node selected, look at the Inspector on the right.
- Find the Sprite Frames property. Click the dropdown (currently
[empty]) and choose New SpriteFrames. - Click on the newly created
SpriteFramesresource to open the bottom SpriteFrames editor panel.
Step 3: Slicing the Sprite Sheet in the SpriteFrames Panel
- In the bottom SpriteFrames panel, you will see a default animation named
default. Rename it to something descriptive, likewalk_down. - In the panel toolbar, click the icon that looks like a small grid: “Add frames from a sprite sheet”.
- Select your sprite sheet texture from the file dialog.
- An interactive slicing window will pop up:
- Set Horizontal (Columns) and Vertical (Rows) to match your sheet’s layout (e.g., 6 columns, 4 rows).
- The grid overlay will immediately divide the texture into numbered cells.
- Click on the specific frames you want to include in this animation state.
- Click the “Add N Frame(s)” button at the bottom right.
[ SpriteFrames Editor ] → └ Selected: Frame 0, Frame 1, Frame 2, Frame 3 Added to ‘walk_down’
Step 4: Configure Animation Speed and Looping
- In the SpriteFrames panel, find the Speed (FPS) setting. For typical 2D pixel walk cycles, set this between
8and12 FPS. - Ensure the Loop toggle is turned on for repeating cycles (like running or idling) and turned off for one-shot actions (like jumping or taking damage).
- Click the Play icon in the SpriteFrames toolbar to watch the animation run in the editor viewport.
Step 5: Controlling Animations with GDScript
Controlling your character’s playback in code is simple:
extends CharacterBody2D

@onready var animated_sprite: AnimatedSprite2D = $AnimatedSprite2D

func _physics_process(delta: float) -> void:
    var direction = Input.get_vector("ui_left", "ui_right", "ui_up", "ui_down")

    if direction != Vector2.ZERO:
        animated_sprite.play("walk_down")
        # Flip sprite horizontally if moving left
        if direction.x != 0:
            animated_sprite.flip_h = direction.x < 0
    else:
        animated_sprite.play("idle")
Summary
Godot 4’s built-in sprite sheet slicing tools eliminate the friction of importing 2D graphics. By leveraging AnimatedSprite2D and SpriteFrames, you can configure complex multi-state character animations in just a few clicks.
(Pro Tip: If you need to unpack or reformat multi-frame assets before importing, use our spritesheet to gif converter and png to spritesheet packer to prepare clean, uniform texture grids).