How to Convert a Sprite Sheet into an Animated GIF (Step-by-Step)
If you have spent any time working with 2D game assets, retro graphics, or digital animations, you know the humble sprite sheet is everywhere. It packs dozens of animation frames into a single flat image grid, saving memory and keeping game engines snappy.
When you want to showcase that character run-cycle on Twitter, drop an animated sticker into Discord, embed a preview on your portfolio, or share progress with your team, a static sprite sheet will not do the job. You need a clean, looping animated GIF.
Turning a static texture grid into a smooth animation used to require firing up heavy desktop image editors, setting up layers by hand, or writing custom slicing scripts. Fortunately, modern browser capabilities make it possible to do all of this in seconds directly on your computer without uploading private game assets to an unknown server.
Let’s walk through how to convert your sprite sheet into an animated GIF, calculate your frame boundaries properly, and get clean, crisp loops every time.
Why Convert a Sprite Sheet into a GIF?
Sprite sheets are built specifically for computer rendering. A game engine loads one texture atlas and rapidly shifts the visible “window” across pixel coordinates to display motion.
Browsers and social platforms do not read texture coordinates natively inside standard image tags. To display your animation on websites, chat apps, and documentation, you need a self-contained animated format.
Here is why converting to GIF is usually the best choice:
- Universal compatibility: Animated GIFs play instantly in virtually every browser, messaging app, and document reader without requiring video players or custom scripts.
- Effortless looping: Unlike video clips that might show replay controls or pause at the end, GIFs loop infinitely by default.
- Easy sharing: You can drop an animated GIF directly into GitHub pull requests, design boards, and client presentations to showcase gameplay animations in real-time.
Understanding Sprite Sheet Grid Geometry
Before slicing any sprite sheet, take a close look at how your frames are organized. Most sprite sheets follow a structured grid system based on uniform rows and columns.
To extract your animation frames without cutting off limbs or leaving awkward gaps, you need three core numbers:
- Total sheet dimensions: The full width and height of your image file in pixels.
- Column and row counts: How many individual frames are arranged horizontally (columns) and vertically (rows).
- Individual frame size: The exact width and height of a single animation cell.
Calculating your cell dimensions is straightforward math:
Frame Width = Total Image Width / Number of Columns
Frame Height = Total Image Height / Number of Rows
If your sprite sheet is 256 pixels wide by 128 pixels tall, with 8 columns and 4 rows, each individual frame is exactly 32 pixels wide and 32 pixels tall.
Step-by-Step: Converting Your Sprite Sheet to GIF
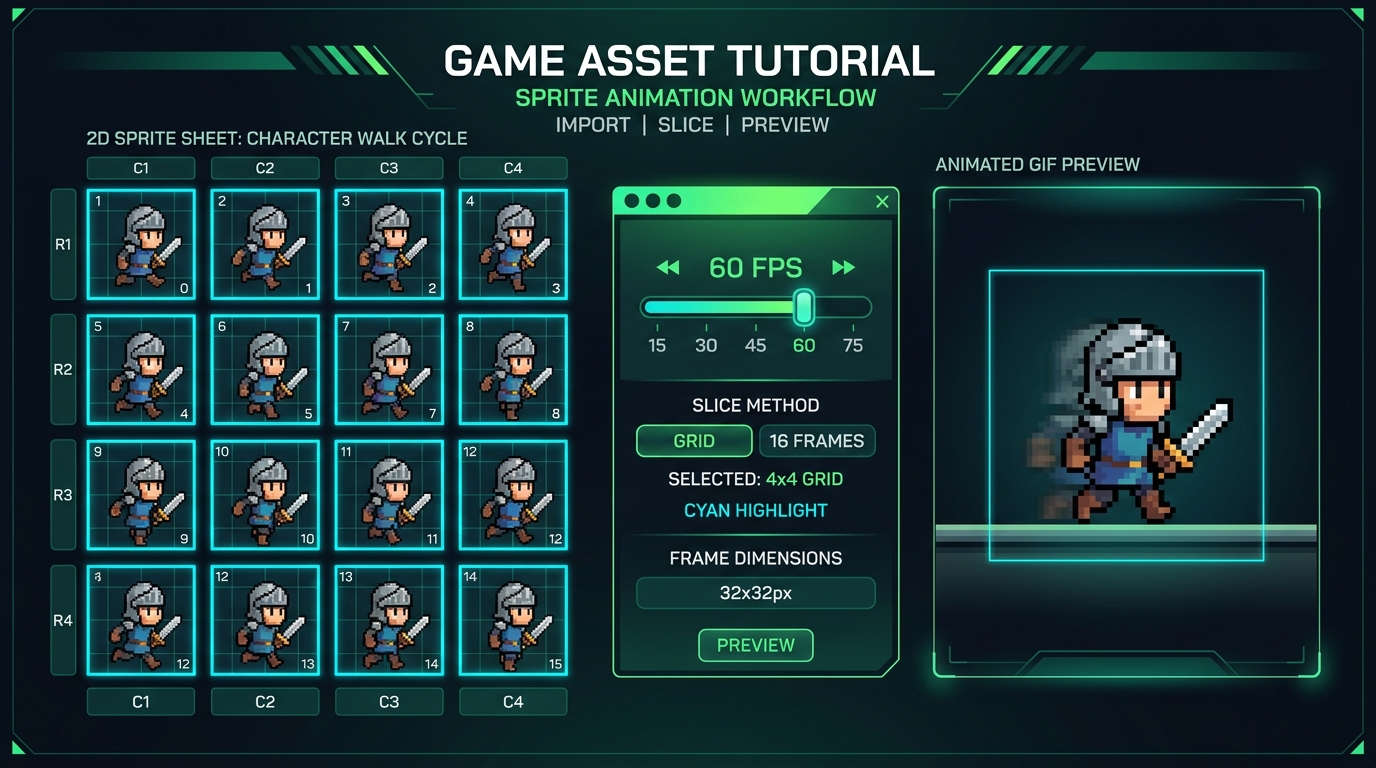
Let’s go through the conversion process step by step. You can use our free spritesheet to gif converter to follow along right in your browser.
Step 1: Load Your Sprite Sheet
Open your sprite sheet file. If you care about keeping unreleased game sprites confidential, use a privacy-first tool that handles processing locally on your machine using HTML5 Canvas and WebAssembly rather than uploading your raw files to an external cloud server.
Step 2: Define Grid Dimensions and Frame Bounds
Input your grid dimensions. Most tools give you two ways to slice:
- By cell count: Specify the number of columns and rows (for example, 6 columns by 1 row).
- By pixel dimensions: Specify the width and height of each frame (for example, 48x48 pixels).
A good converter will draw an interactive grid overlay right on top of your sprite sheet so you can immediately see if the slicing lines match your character boundaries.
Step 3: Set Your Animation Frame Rate (FPS)
Frame rate dictates the perceived speed and weight of your animation:
- 8 to 12 FPS: Perfect for classic retro pixel art, stylized walk cycles, and arcade-style combat moves.
- 24 to 30 FPS: Ideal for modern hand-drawn 2D animations and fluid motion graphics.
- 60 FPS: Used for ultra-smooth UI micro-animations and physics-driven particle effects.
If your character’s walk cycle looks like it is sprinting, lower the frame rate to around 10–12 FPS. If it looks choppy, bump it up or verify you have selected all sequential frames in the correct order.
Step 4: Preview the Animation Loop in Real Time
Always test playback before exporting. Watch for common visual quirks:
- Jittering or shaking: Usually caused by inconsistent frame bounding boxes or incorrect pixel offsets.
- Clipping: When a weapon or outstretched hand crosses over into an adjacent frame’s boundary.
- Trailing ghost pixels: Occurs when background transparency is not cleared properly between frame renders.
Step 5: Export Your Animated GIF
Once the preview looks smooth and steady, hit export. Your browser will assemble the frames, encode the color palette, and generate a downloadable .gif file ready for web sharing.
Pro Tips for Pixel-Perfect GIF Quality
Creating a clean GIF from a sprite sheet requires paying attention to a few technical details that can make a big difference in output quality.
1. Maintain Nearest-Neighbor Scaling for Pixel Art
If you are converting low-resolution pixel art (such as 16x16 or 32x32 character sprites), modern display scaling can turn crisp pixels into a blurry, muddy mess. Always ensure your converter uses Nearest Neighbor scaling (often labeled as “Pixelated” or “Crisp” mode) when blowing up small sprites for social media posts.
2. Preserve Alpha Transparency
Traditional GIFs support 1-bit transparency, meaning a pixel is either 100% opaque or 100% transparent. If your sprite contains smooth semi-transparent drop shadows or glowing edges, consider rendering your GIF on a solid background color matching your target website to prevent ugly fringing around the borders.
3. Trim Empty Padding
Sprite sheets frequently have trailing blank cells at the end of the grid to maintain even row counts. When setting up your conversion range, make sure to set the ending frame to your animation’s actual final frame so you do not get an awkward blank flash at the end of each loop.
Where to Go from Here
Converting your texture grids into animated GIFs makes sharing your work effortless. Whether you are building an indie game devlog, assembling a design portfolio, or updating documentation, browser-side conversion gives you immediate results without friction.
Ready to convert your assets? Head over to our free spritesheet to gif converter to slice your sheets, adjust frame rates, and export crisp animated GIFs in seconds. If you are working in reverse and need to extract frames from existing clips, you can also use our gif to spritesheet splitter to unpack any animation back into an editable grid.